Raspberry Pi 使用NFC模块读取标签

使用网上的教程,链接 http://www.geek-workshop.com/thread-10042-1-1.html 。

原文包含SPI和I2C总线两种方式,因为我不想插上一大把线,所以只用了I2C接口,所以内容有删节。

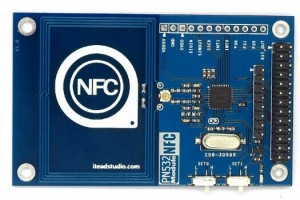
libnfc是首个遵循GNU(自由工程项目)通用公共许可证针对所有人都完全免费的低级别NFC软件开发包和编程应用程序接口。它提供了完整的透明度且免费供大家使用。该库目前支持调制ISO / IEC14443 A和B,FeliCa,Jewel/Topaz标签及数据交换协议(P2P)作为目标和启动程序。想了解更多关于libnfc的信息,可参考http://nfc-tools.org/ITEAD PN532 NFC模块配有双排引脚,可直接通过排线连接到树莓派,然后树莓派将驱动模块进行非接触式近场通信操作,如读写13.56M IC卡。

154149rr5dubo9wbj9wlrw

以下教程,演示如何在树莓派上使用libnfc通过SPI总线来驱动ITEAD PN532 模块。

1, 硬件链接

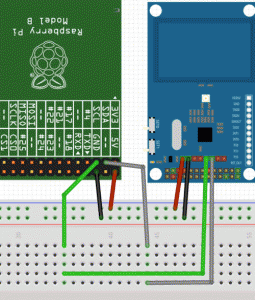
Itead PN532 Module是使用四条线连接,如下图

154152srjo5ttbbbza07bt

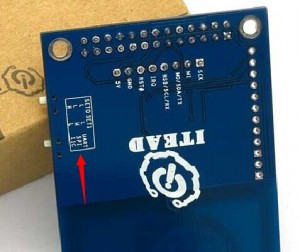
按照上图的连接方式,Itead PN532 模块是通过SPI总线与树莓派连接的,所以需要把NFC模块的工作模式设置为I2C模式,如下图:
即 :  SET0–>H   SET1–>L

154150t0vova0ahg3ta0u8

2,安装依赖的软件包
sudo apt-get update
sudo apt-get install libusb-dev libpcsclite-dev

3,下载并解压缩libnfc源码包
cd ~
wget http://dl.bintray.com/nfc-tools/sources/libnfc-1.7.1.tar.bz2
tar -xf libnfc-1.7.1.tar.bz2

4,编译与安装
cd libnfc-1.7.1
./configure –prefix=/usr –sysconfdir=/etc
make
sudo make install

5, 修改配置文件
cd /etc
sudo mkdir nfc
sudo nano /etc/nfc/libnfc.conf

将如下内容复制到/etc/nfc/libnfc.conf文件中:

# Allow device auto-detection (default: true)
# Note: if this auto-detection is disabled, user has to set manually a device
# configuration using file or environment variable
allow_autoscan = true

# Allow intrusive auto-detection (default: false)
# Warning: intrusive auto-detection can seriously disturb other devices
# This option is not recommended, user should prefer to add manually his device.
allow_intrusive_scan = false

# Set log level (default: error)
# Valid log levels are (in order of verbosity): 0 (none), 1 (error), 2 (info), 3 (debug)
# Note: if you compiled with –enable-debug option, the default log level is “debug”
log_level = 1

# Manually set default device (no default)
# To set a default device, you must set both name and connstring for your device
# Note: if autoscan is enabled, default device will be the first device available in device list.
device.name = “Itead_PN532_SPI”
device.connstring = “pn532_i2c:/dev/i2c-1”

6,树莓派系统默认是将SPI模块的驱动关闭的,我们需要将其打开;

sudo nano /etc/modprobe.d/raspi-blacklist.conf

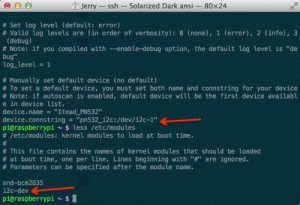
树莓派开启I2C总线,将/etc/modprobe.d/raspi-blacklist.conf中“blacklist i2c-bcm2708”变为“#blacklist i2c-bcm2708”
在/etc/modules末尾添加一行 “i2c-dev”

154152dpob3559dxp2xkp5

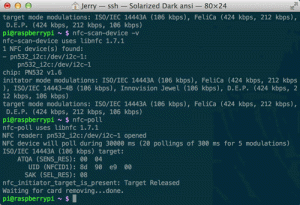
刷卡测试,运行效果如图:

154152sifdbr1fadiqz5ib

———————————————————————————————–
参考资料附录&相关链接:
A1. libnfc配置方法:http://nfc-tools.org/index.php?title=Libnfc:configuration
A2. libnfc安装教程:http://nfc-tools.org/index.php?title=Libnfc
A3. libnfc用户API:http://nfc-tools.org/index.php?title=Libnfc:API
A4. libnfc主页:http://nfc-tools.org/index.php?title=Main_Page
A5. libnfc学习例程:ibnfc:Examples” target=”_blank”>http://nfc-tools.org/index.php?title=Categoryibnfc:Examples
A6. Iteadstudio PN532 Module 网址 http://imall.iteadstudio.com/im130625002.html

A7. Disable R-Pi/RASPBIAN serial console for using UART0 http://learn.adafruit.com/adafruit-nfc-rfid-on-raspberry-pi/freeing-uart-on-the-pi
————————————————————————————————-
教程到此结束,谢谢大家!有问题请留言或微博@ITEAD创易工作室

以上为引用原文并修改了部分内容和顺序。当时测试时没有修改跳线,始终无法读到数据,后来查到PN532说明书,才知道要修改set0->H,set1->L(文中已添加),数据才读取成功。


规划:Pi读取NFC刷卡记录,然后传到网上,并通过微信、短信、微博通知。

场景:父母想知道孩子已经到达某处,可以通过这种方式获得通知。

后续文章会贴出后台部分。

SvcHost.exe 占用资源 解决方法

最近电脑一直出现卡死的现象,打开任务管理器发现有一个svchost占用了两百多兆内存,甚至更多,网站查了很久,只知道这是系统服务的一个宿主进程。
后来在英文网站找到,如何查看它关联的方法,运行 tasklist /svc /fi “imagename eq svchost.exe”

C:\Users\ADMIN>tasklist /svc /fi “imagename eq svchost.exe”

Image Name PID Services
========================= ======== ============================================
svchost.exe 808 DcomLaunch, PlugPlay, Power
svchost.exe 924 RpcEptMapper, RpcSs
svchost.exe 992 AudioSrv, Dhcp, eventlog, lmhosts, wscsvc
svchost.exe 384 AudioEndpointBuilder, CscService, hidserv,
Netman, PcaSvc, TrkWks, UxSms, Wlansvc,
wudfsvc
svchost.exe 528 Appinfo, AppMgmt, BITS, EapHost, gpsvc,
IKEEXT, iphlpsvc, LanmanServer, MMCSS,
ProfSvc, RasMan, Schedule, SENS,
ShellHWDetection, Themes, Winmgmt, wuauserv
svchost.exe 1084 EventSystem, netprofm, nsi, SstpSvc,
WdiServiceHost, WinHttpAutoProxySvc
svchost.exe 1196 CryptSvc, Dnscache, LanmanWorkstation,
NlaSvc, TapiSrv
svchost.exe 1300 BFE, DPS, MpsSvc, WwanSvc
svchost.exe 1532 FontCache, SCardSvr, SSDPSRV, upnphost
svchost.exe 3648 stisvc
svchost.exe 3148 PolicyAgent
svchost.exe 8776 SDRSVC

对照任务管理器的进程ID,知道是384进程号,看上表是AudioEndpointBuilder, CscService, hidserv,Netman, PcaSvc, TrkWks, UxSms, Wlansvc,wudfsvc这一堆乱其八糟的服务,似乎还是没找到解决方案。

再继续google,有个老外的回答

Hi guys,

I got the same problem with Local system network restricted that it chews up my CPU to 80% for doing nothing at the startup on my win 7.

I found out the reason is because of the Superfetch service which pre-loads apps when u start the computer up. Check it out here :http://en.wikipedia.org/wiki/Windows_Vista_I/O_technologies#SuperFetch

There’s likely a chance that there ‘s a conflict in one of those drivers or dll files of the apps. For my particular laptop is my wireless card’s driver.

So jump into services.msc >> Superfetch >> stop then disable it may help u get away with it.

Hope that helps

Cheers

Ken

参考 http://social.technet.microsoft.com/Forums/windows/en-US/f23f7cfb-cda7-45e0-9b0c-39e490d4b5cd/svchostexe-localsystemnetworkrestricted-using-45-mem-virus?forum=w7itprosecurity 和 http://en.wikipedia.org/wiki/Windows_Vista_I/O_technologies#SuperFetch 原来是SuperFetch在搞鬼。停用并禁用,问题解决。

php中增加mongodb支持

网上使用云数据库已经火了很长一段时间了,今天我也试试看这个功能。但是php并不自带mongodb模块,只能从github下载了编译安装模块。
(下载地址:https://github.com/mongodb/mongo-php-driver/archive/master.zip),下载该源码包,然后执行以下命令:
$ unzip master
$ cd mongo-php-driver-master
$ phpize
$ ./configure
$ make && make install
如果你的php是自己编译的,则安装方法如下(假设是编译在/usr/local/php目录中):
$ unzip master
$ cd mongo-php-driver-master
$ /usr/local/php/bin/phpize
$ ./configure –enable-mongo=share –with-php-config=/usr/local/php/bin/php-config
$ make && make install
最后出现的提示Build complete.Don’t forget to run ‘make test’.
Installing shared extensions: /usr/local/php/lib/php/extensions/no-debug-non-zts-20090626/
说明安装成功 接下来配置php.ini
编辑php.ini 加入
extension=mongo.so

可以在phpinfo里面看到mongo就大功告成了。

php破解QQ空间防盗链

发现之前发的一些帖子引用了QQ空间的照片,这些照片都无法正常显示了。给wordpress下载了远程下载图片的插件,似乎没法正常工作,在网上另外找了段防盗链的方法,这些照片都可以正常显示了。

ssh后台运行 linux重定向及nohup不输出的方法

linux重定向及nohup不输出的方法
先说一下linux重定向:
0、1和2分别表示标准输入、标准输出和标准错误信息输出,可以用来指定需要重定向的标准输入或输出。
在一般使用时,默认的是标准输出,既1.当我们需要特殊用途时,可以使用其他标号。例如,将某个程序的错误信息输出到log文件中:./program 2>log。这样标准输出还是在屏幕上,但是错误信息会输出到log文件中。
另外,也可以实现0,1,2之间的重定向。2>&1:将错误信息重定向到标准输出。
Linux下还有一个特殊的文件/dev/null,它就像一个无底洞,所有重定向到它的信息都会消失得无影无踪。这一点非常有用,当我们不需要回显程序的所有信息时,就可以将输出重定向到/dev/null。
如果想要正常输出和错误信息都不显示,则要把标准输出和标准错误都重定向到/dev/null, 例如:

# ls 1>/dev/null 2>/dev/null

还有一种做法是将错误重定向到标准输出,然后再重定向到 /dev/null,例如:

# ls >/dev/null 2>&1

注意:此处的顺序不能更改,否则达不到想要的效果,此时先将标准输出重定向到 /dev/null,然后将标准错误重定向到标准输出,由于标准输出已经重定向到了/dev/null,因此标准错误也会重定向到/dev/null,于是一切静悄悄:-)

由于使用nohup时,会自动将输出写入nohup.out文件中,如果文件很大的话,nohup.out就会不停的增大,这是我们不希望看到的,因此,可以利用/dev/null来解决这个问题。

nohup ./program >/dev/null 2>log &

如果错误信息也不想要的话:

nohup ./program >/dev/null 2>&1 &

要实现守护进程,一种方法是按守护进程的规则去编程(本站有文章介绍过),比较麻烦;另一种方法是仍然用普通方法编程,然后用nohup命令启动程序:
nohup &
则控制台logout后,进程仍然继续运行,起到守护进程的作用(虽然它不是严格意义上的守护进程)。
使用nohup命令后,原程序的的标准输出被自动改向到当前目录下的nohup.out文件,起到了log的作用,实现了完整的守护进程功能。

ygwu @ 2005年04月18日 上午10:03

For example:
如何远程启动WebLogic服务?
用telnet远程控制服务器,远程启动WEBLOGIC服务,启动后关闭telnet,WebLogic服务也跟着停止,这是因为使用telnet启动的进程会随着telnet进程的关闭而关闭。所以我们可以使用一些UNIX下的命令来做到不关闭。

使用如下命令:

nohup startWeblogic.sh&

如果想要监控标准输出可以使用:

tail -f nohup.out

访客留言
FreeBSD可以同时运行多个进程,在shell下直接输入命令后,shell将进程放到前台执行。如果要将进程放到后台执行,需要在命令行的结尾加上一个 “&” 符号。下面的命令从后台执行,从ftp.isc.org下载文件。

$ fetch ftp://ftp.isc.org/pub/inn/inn-1.7.2.tar.gz &

当程序已经在前台执行的时候,可以使用^Z将这个程序挂起,暂停执行。然后可以使用bg命令将这个挂起的程序放到后台执行,或者使用fg将某个在后台或挂起的进程放到前台执行。

当在后台运行了程序的时候,可以用jobs命令来查看后台作业的状态。在有多个后台程序时,要使用来参数的fg命令将不同序号的后台作业切换到前台上运行。

$ jobs

[1]+ Running fetch ftp://ftp.isc.org/pub/inn/inn-1.7.2.tar.gz &

$ fg %1

fetch ftp://ftp.isc.org/pub/inn/inn-1.7.2.tar.gz

在启动了多个程序之后,可以使用ps命令来查看这些进程及其状态。

$ ps

PID TT STAT TIME COMMAND

501 p2 Ss 0:00.24 -bash (bash)

988 p2 R+ 0:00.00 ps

765 p3 Is+ 0:00.28 -bash (bash)

230 v0 Is+ 0:00.14 -bash (bash)

显示的结果包括进程的标识号PID,控制终端TT(p0表示控制终端为ttyp0),进程的状态STAT,进程使用的处理器时间TIME和具体的命令。

可以给ps命令加上参数,来获得更多的输出内容,以下命令将输出系统中所有的进程:

$ ps waux

USER PID %CPU %MEM VSZ RSS TT STAT STARTED TIME COMMAND

wb 989 0.0 0.4 400 236 p2 R+ 5:48PM 0:00.00 ps -aux

root 1 0.0 0.1 496 72 ?? Is 10:12PM 0:00.02 /sbin/init —

root 2 0.0 0.0 0 0 ?? DL 10:12PM 0:07.05 (pagedaemon)

root 3 0.0 0.0 0 0 ?? DL 10:12PM 0:00.20 (vmdaemon)

root 4 0.0 0.0 0 0 ?? DL 10:12PM 0:04.27 (syncer)

root 27 0.0 0.0 204 0 ?? IWs – 0:00.00 (adjkerntz)

root 91 0.0 0.5 820 328 ?? Is 2:12PM 0:00.82 syslogd

daemon 100 0.0 0.0 792 0 ?? IWs – 0:00.00 (portmap)

root 131 0.0 0.3 864 164 ?? Is 2:12PM 0:00.06 inetd

root 134 0.0 0.3 980 192 ?? Is 2:12PM 0:00.11 cron

root 138 0.0 0.6 1252 380 ?? Is 2:12PM 0:00.11 sendmail: accepti

wb 230 0.0 1.1 1540 668 v0 Is+ 2:12PM 0:00.14 -bash (bash)

root 231 0.0 0.0 824 0 v1 IWs+ – 0:00.00 (getty)

root 232 0.0 0.0 824 0 v2 IWs+ – 0:00.00 (getty)

root 500 0.0 0.9 876 524 ?? Ss 4:19PM 0:01.78 telnetd

wb 501 0.0 1.4 1540 888 p2 Ss 4:19PM 0:00.24 -bash (bash)

root 698 0.0 1.5 1644 900 ?? Is 4:49PM 0:00.02 /usr/local/sbin/s

root 700 0.0 1.2 1308 748 ?? Ss 4:49PM 0:00.22 /usr/local/sbin/n

root 702 0.0 3.4 2900 2112 ?? S 4:49PM 0:00.32 /usr/local/sbin/s

root 764 0.0 0.9 880 540 ?? Is 5:10PM 0:00.22 telnetd

wb 765 0.0 1.7 1536 1052 p3 Is+ 5:10PM 0:00.28 -bash (bash)

root 0 0.0 0.0 0 0 ?? DLs 10:12PM 0:00.02 (swapper)

当用户启动一个进程的时候,这个进程是运行在前台,使用与相应控制终端相联系的标准输入、输出进行输入和输出。即使将进程的输入输出重定向,并将进程放在后台执行,进程仍然和当前终端设备有关系。正因为如此,在当前的登录会话结束时,控制终端设备将和登录进程相脱离,那么系统就向所有与这个终端相联系的进程发送SIGHUP的信号,通知进程线路已经挂起了,如果程序没有接管这个信号的处理,那么缺省的反应是进程结束。因此普通的程序并不能真正脱离登录会话而运行进程,为了使得在系统登录后还可以正常执行,只有使用命令nohup来启动相应程序。

从上面的ps的输出结果可以看出,有些程序没有控制终端,这些程序通常是一些后台进程。使用命令nohup当然可以启动这样的程序,但nohup启动的程序在进程执行完毕就退出,而常见的一些服务进程通常永久的运行在后台,不向屏幕输出结果。在Unix中这些永久的后台进程称为守护进程(daemon)。守护进程通常从系统启动时自动开始执行,系统关闭时才停止。如果偶然某个守护进程消失了,那么它提供的服务将不再能被使用。

在守护进程中,最重要的一个是超级守护进程inetd,这个进程接管了大部分网络服务,但并不是对每个服务都自己进行处理,而是依据连接请求,启动不同的服务程序与客户机打交道。inetd支持网络服务种类在它的设置文件/etc/inet.conf中定义。inet.conf文件中的每一行就对应一个端口地址,当inetd接受到连接这个端口的连接请求时,就启动相应的进程进行处理。使用inetd的好处是系统不必启动很多守护进程,从而节约了系统资源,然而使用inetd启动守护进程相应反应会迟缓一些,不适合用于被密集访问的服务进程

用iptables自动封IP,防SSH被暴力破解

之前没太关注服务器的攻击,几天突然发现/var/log/secure下面有很多ssh登陆失败的日志,甚至同一个ip有两天多次的攻击,吓了一身冷汗。虽然是个人站,没有太多机密资料,但是被攻击总不是好事情。也许哪天攻破后,就被他们用来干坏事了。还是处理一下比较好。

先把ip过滤出来,然后加到iptables里面

#!/bin/bash
num=10 #上限
for i in `awk ‘/Failed/{print $(NF-3)}’ /var/log/secure|sort|uniq -c|sort -rn|awk ‘{if ($1>$num){print $2}}’`
do

 #先删除该条,防止重复的规则,虽然iptables可以执行重复的规则,也许会影响到执行的性能,还是删掉比较好。
iptables -D INPUT -p tcp -s $i –dport 22 -j DROP

#添加规则
iptables -I INPUT -p tcp -s $i –dport 22 -j DROP
done

另外写了一条,将日志导出到某个文件,方便查看

cat /var/log/secure|awk ‘/Failed/{print $(NF-3)}’|sort|uniq -c|sort -rn|awk ‘{print $2″=”$1;}’ >/path/fail.txt


将这两条都加入到crontab里面,隔几分钟执行一次。

另外强烈鄙视一下下面这些IP,诅咒早日关门大吉。

116.10.191.165=162
116.10.191.183=183
116.10.191.196=113
116.10.191.204=135
116.10.191.227=184
116.10.191.229=41
116.10.191.230=173
117.21.225.157=301
117.79.91.244=882
212.83.150.76=24
61.174.50.235=170
61.174.51.232=35
61.33.155.74=124
82.221.106.233=1


1.234.70.30=23
115.239.248.121=72
115.239.248.122=90
115.239.248.50=24
115.239.248.51=18
115.239.248.57=12
115.239.248.61=144
115.239.248.90=60
116.10.191.167=142
116.10.191.175=168
116.10.191.236=26
117.21.191.209=48
117.21.191.210=78
117.21.225.157=78
117.21.226.103=60
183.56.129.146=20
198.8.61.141=15
220.177.198.24=228
220.177.198.38=30
220.177.198.40=90
220.177.198.43=12
220.177.198.93=264
222.186.34.143=138
222.186.34.36=330
222.186.38.109=42
222.186.40.170=306
222.186.40.251=198
222.186.56.33=48
58.241.61.162=53
60.173.26.16=2594
61.174.50.216=40
61.174.51.207=151
61.174.51.217=150
61.174.51.227=222
61.174.51.235=2

[转载]PHP 5.3.17 编译安装时出现 undefined reference to `libiconv’ 错误的解决方法


手动编译PHP安装时遇到如下错误
/usr/local/src/php-5.3.10/ext/xmlrpc/libxmlrpc/encodings.c:73: undefined reference to `libiconv_open’ /usr/local/src/php-5.3.10/ext/xmlrpc/libxmlrpc/encodings.c:81: undefined reference to `libiconv’ /usr/local/src/php-5.3.10/ext/xmlrpc/libxmlrpc/encodings.c:101: undefined reference to `libiconv_close’ collect2: ld returned 1 exit status make: *** [sapi/fpm/php-fpm] 错误
 1 表面看,是libiconv安装问题,重装libiconv之后问题依旧,网上看有人舍弃libiconv,使用 –without-iconv,我觉的不可取,这样是回避问题。 找了n久,终于找到bug所在: 在执行完 ./configure … 之后,修改下 Makefile,找到其中的
EXTRA_LIBS = -lcrypt -lz -lcrypt -lrt -lmysqlclient -lmcrypt -lldap -llber -lfreetype -lpng -lz -ljpeg -lcurl -lz -lrt -lm -ldl -lnsl -lrt -lxml2 -lz -lm -lssl -lcrypto -ldl -lz -lcurl -ldl -lgssapi_krb5 -lkrb5 -lk5crypto -lcom_err -lidn -lssl -lcrypto -lz -lxml2 -lz -lm -lssl -lcrypto -ldl -lz -lxml2 -lz -lm -lxml2 -lz -lm -lcrypt -lxml2 -lz -lm -lxml2 -lz -lm -lxml2 -lz -lm -lxml2 -lz -lm -lcrypt
 在最后面添加 -liconv ,修改后如下
EXTRA_LIBS = -lcrypt -lz -lcrypt -lrt -lmysqlclient -lmcrypt -lldap -llber -lfreetype -lpng -lz -ljpeg -lcurl -lz -lrt -lm -ldl -lnsl -lrt -lxml2 -lz -lm -lssl -lcrypto -ldl -lz -lcurl -ldl -lgssapi_krb5 -lkrb5 -lk5crypto -lcom_err -lidn -lssl -lcrypto -lz -lxml2 -lz -lm -lssl -lcrypto -ldl -lz -lxml2 -lz -lm -lxml2 -lz -lm -lcrypt -lxml2 -lz -lm -lxml2 -lz -lm -lxml2 -lz -lm -lxml2 -lz -lm -lcrypt -liconv

本文出自 “技术成就梦想” 博客,请务必保留此出处http://flyfishes.blog.51cto.com/3527694/819693

PHP根据图片Orientation旋转图片

最近发现发送到微信公众平台的图片被旋转了90度,导致后续操作出错。后来仔细研究,发现用iphone前置摄像头拍出来的照片会自动镜像,而且会右旋90度,之前TX服务器会处理这种情况,貌似最近不干了,害客户抱怨我这里的问题。

然后开始研究服务器传回来照片的格式,发现exif里面Orientation的值为6,正好是右旋了90度,正好可以根据这个来自动调整图片。

首先读取exif值

$exif = exif_read_data($src, 0, true);

if($exif[‘IFD0’][‘Orientation’]==6){
flip($src,$src,-90);
}

其实还有其他方向,也可以根据这个来旋转,我这里只需要这么多。

另外附上flip方法

function flip($filename,$src,$degrees=90)
{
//读取图片
$data = @getimagesize($filename);
if($data==false)return false;
//读取旧图片
switch ($data[2]) {
case 1:
$src_f = imagecreatefromgif($filename);break;
case 2:
$src_f = imagecreatefromjpeg($filename);break;
case 3:
$src_f = imagecreatefrompng($filename);break;
}
if($src_f==””)return false;
$rotate = @imagerotate($src_f, $degrees,0);
if(!imagejpeg($rotate,$src,100))return false;
@imagedestroy($rotate);
return true;
}


万一你机器上面没有exif模块,参照我前一篇博文。

php编译扩展

今天在php程序中要使用exif信息,发现服务器的php居然没有编译这个模块,网上找了个教程,在这里做个笔记,省得以后忘了。

cd [php-source-dir]/ext/exif/
export PHP_PREFIX=”[your php install full path]”
$PHP_PREFIX/bin/phpize
./configure –enable-exif=shared –with-php-config=$PHP_PREFIX/bin/php-config
make
make install

配置php.ini
extension=”…/exif.so”
或者设置extension_dir = “[so-path]” , extension=”exif.so”

重起nginx

Raspberry Pi 播放 1080p视频

看到网上说树莓派支持1080P视频的播放,专门下载了片子尝试,经常卡死。后来看到说超频后效果好一些。在xbian里面试验了一下,效果没有太大改善。

难道是硬盘原因?这个移动硬盘比较老,大概是5400转的。我通过网络尝试访问Pi,共享拷贝文件,居然只有20多k的速度,换了个比较新的硬盘,速度也没有改善多少,大概40多K,看样子不是硬盘的问题。

难道是usb hub的原因?这个hub比较老,难道是usb 1.0或者1.1的?在网上搜了一下,线材及usb hub本身原因,严重影响移动硬盘速度,甚至会损坏硬盘,所以不建议将硬盘接在hub上。将移动硬盘连直接接到Pi上,网络拷贝速度已经可以达到2.8M,虽然和电脑之间拷贝的20多M速度相比还很慢,已经算是可以接受了。用xbmc开始播放硬盘的1080P电影,果然不卡了,yeah!


总结,硬盘、摄像头之类的设备最好直接接在Pi上,鼠标键盘可以通过usb hub扩展,否则严重影响速度和效率。至于要不要超频,反而影响不是很大。

DO NOT use USB HUB to extend you movable disk or camera, it will slow down your read speed even you can not use it.

PHP的图片处理功能

在一个小项目里需要用到php的图像处理功能,才发现php通过imagefilter能够实现强大的功能。

imagefilter

(PHP 5)

imagefilter — Applies a filter to an image

Description

bool imagefilter ( resource $image , int $filtertype [, int $arg1 [, int $arg2 [, int $arg3[, int $arg4 ]]]] )

imagefilter() applies the given filter filtertype on the image.

Parameters

image
An image resource, returned by one of the image creation functions, such as imagecreatetruecolor().
filtertype
filtertype can be one of the following:

  • IMG_FILTER_NEGATE: Reverses all colors of the image.
  • IMG_FILTER_GRAYSCALE: Converts the image into grayscale.
  • IMG_FILTER_BRIGHTNESS: Changes the brightness of the image. Use arg1 to set the level of brightness.
  • IMG_FILTER_CONTRAST: Changes the contrast of the image. Use arg1 to set the level of contrast.
  • IMG_FILTER_COLORIZE: Like IMG_FILTER_GRAYSCALE, except you can specify the color. Use arg1arg2 andarg3 in the form of redgreenblue and arg4 for the alpha channel. The range for each color is 0 to 255.
  • IMG_FILTER_EDGEDETECT: Uses edge detection to highlight the edges in the image.
  • IMG_FILTER_EMBOSS: Embosses the image.
  • IMG_FILTER_GAUSSIAN_BLUR: Blurs the image using the Gaussian method.
  • IMG_FILTER_SELECTIVE_BLUR: Blurs the image.
  • IMG_FILTER_MEAN_REMOVAL: Uses mean removal to achieve a “sketchy” effect.
  • IMG_FILTER_SMOOTH: Makes the image smoother. Use arg1 to set the level of smoothness.
  • IMG_FILTER_PIXELATE: Applies pixelation effect to the image, use arg1 to set the block size and arg2 to set the pixelation effect mode.
arg1
  • IMG_FILTER_BRIGHTNESS: Brightness level.
  • IMG_FILTER_CONTRAST: Contrast level.
  • IMG_FILTER_COLORIZE: Value of red component.
  • IMG_FILTER_SMOOTH: Smoothness level.
  • IMG_FILTER_PIXELATE: Block size in pixels.
arg2
  • IMG_FILTER_COLORIZE: Value of green component.
  • IMG_FILTER_PIXELATE: Whether to use advanced pixelation effect or not (defaults to FALSE).
arg3
  • IMG_FILTER_COLORIZE: Value of blue component.
arg4
  • IMG_FILTER_COLORIZE: Alpha channel, A value between 0 and 127. 0 indicates completely opaque while 127 indicates completely transparent.

Return Values

Returns TRUE on success or FALSE on failure.

我用到的几个功能

imagefilter($dst_r, IMG_FILTER_BRIGHTNESS, -80);

The documentation misses the exact meaning and valid ranges of the arguments for ImageFilter(). According to the 5.2.0 sources the arguments are:
IMG_FILTER_BRIGHTNESS
-255 = min brightness, 0 = no change, +255 = max brightness

IMG_FILTER_CONTRAST
-100 = max contrast, 0 = no change, +100 = min contrast (note the direction!)

IMG_FILTER_COLORIZE
Adds (subtracts) specified RGB values to each pixel. The valid range for each color is -255…+255, not 0…255. The correct order is red, green, blue.
-255 = min, 0 = no change, +255 = max
This has not much to do with IMG_FILTER_GRAYSCALE.

IMG_FILTER_SMOOTH
Applies a 9-cell convolution matrix where center pixel has the weight arg1 and others weight of 1.0. The result is normalized by dividing the sum with arg1 + 8.0 (sum of the matrix).
any float is accepted, large value (in practice: 2048 or more) = no change

ImageFilter seem to return false if the argument(s) are out of range for the chosen filter.


You must add imagesavealpha($im, true); so the alpha channel will be saved on the new image.

$im = imagecreatefrompng('image.png');
imagealphablending($im, false);

imagesavealpha($im, true);

if($im && imagefilter($im, IMG_FILTER_COLORIZE, 0,0,255,0)) {
    imagepng($im, 'image-new.png');
    imagedestroy($im);
}

mysql 创建 function 错误 1064解决方案

在mysql5.1创建function时,总是报下面的错误

#1064 – You have an error in your SQL syntax; check the manual that corresponds to your MySQL server version for the right syntax to use near ” at line 4

检查很多遍都没发现语法错误,苦恼很久。

后上网查到,是因为mysql分隔符的问题,默认是以;作为分隔符,而function或者procedure里面很多时候都要用分号,所以造成这个问题。

解决方法是用DELIMITER //预先定义分隔符,这样就解决了这个问题。存档以防将来之需。

如下是创建随机字符串的function

DELIMITER //

CREATE FUNCTION `rand_string`(n INT) RETURNS varchar(255) CHARSET utf8
BEGIN
DECLARE chars_str varchar(100) DEFAULT ‘abcdefghijklmnopqrstuvwxyzABCDEFGHIJKLMNOPQRSTUVWXYZ0123456789’;
DECLARE return_str varchar(255) DEFAULT ”;
DECLARE i INT DEFAULT 0;
WHILE i < n DO
SET return_str = concat(return_str,substring(chars_str , FLOOR(1 + RAND()*62 ),1));
SET i = i +1;
END WHILE;
RETURN return_str;
END; //

php 错误

Php运行的时候,提示下列错误

PHP Deprecated: Comments starting with ‘#’ are deprecated in /etc/php5/cli/conf.d/ming.ini on line 1 in Unknown on line 0

后google解决,纯记录。

#注释已经去掉,换成分号就可以了

find /etc/php5/cli/conf.d/ -name “*.ini” -exec sed -i -re ‘s/^(\s*)#(.*)/\1;\2/g’ {} \;

heart bleeding 修复

前段时间,让整个互联网都震动的heart bleeding漏洞,一下子所有https加密网站都受到影响。

因为我的加密网站用的不多,所以没管它,今天想起来就来补这个漏洞了。

下载openssl包,编译,安装就可以了。

但是编译过程中出现了点问题,上网找了很久,用下面的方法就可以了

./config

make clean

make zlib

make

make install

然后which openssl

openssl version -a

看看最后的时间是不是2014年4月7号或者8号,如果是之前的版本就不对了。

通过这两个网址可以检测。

https://lastpass.com/heartbleed/                   <!–貌似这个内容更多。

https://filippo.io/Heartbleed/     <!–这个好像被墙了。