
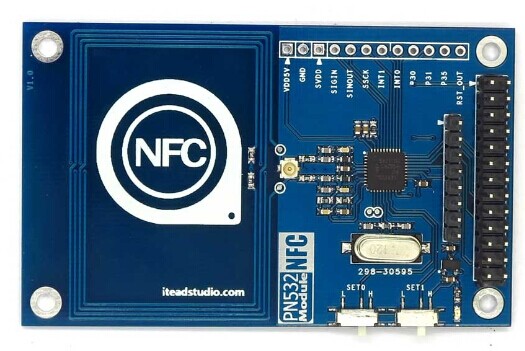
how to running PN532 and W5100 on same board
最近研究arduino开发板,尝试将NFC板(PN532)和网络扩展板(w5100)组合在一起,碰到个问题,这两块板子都是通过SPI总线和arduino通信,同时占用pin10,11,12,13三个口,其中10是片选信号SS。这两个设备始终无法同时工作,出现很多莫名其妙的问题。
比如我编译IDE自带的webserver程序,设置了ip地址为192.168.1.15,启动以后,ping 192.168.1.15可以通,但在串口接收到 ip地址为192.139.1.15,甚至是192.192.192.192,或者其他乱七八糟的地址。在PC上访问http://192.168.1.15无法打开。拔除NFC扩展板,web访问正常。然后开始漫长google之路。
参考链接
http://arduino.cc/en/Main/ArduinoEthernetShield
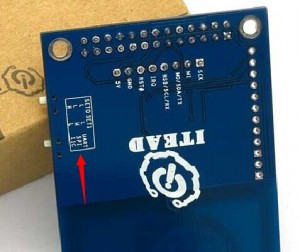
1.首先确认两个设备不能使用同一个SS pin,将nfc的nss针插到其他pin(貌似1,2,4,不能使用,4是SD卡的片选),我选择5,然后在arduino的setup里面增加
pinMode(5,OUTPUT);
digitalWrite(5,HIGH);
测试同时连接NFC和网络,只初始化网卡,webserver正常;如果同时初始化网卡和NFC,依旧无法访问webserver
参考链接
http://www.circuitsathome.com/mcu/running-multiple-slave-devices-on-arduino-spi-bus
2.继续google,发现两个设备的setBitOrder似乎不同,PN532是LSBFIRST,而网络是WSBFIRST,
找到原因后就简单了,只需要启动不同设备的时候,不仅仅设置SS,还要重新设置SPI的参数。
找到PN532.cpp的begin(),大约在43行,将
pn532_SPI.setDataMode(SPI_MODE0);
pn532_SPI.setBitOrder(LSBFIRST);
/*Set the SPI frequency to be one sixteenth of the
frequency of the system clock*/
pn532_SPI.setClockDivider(SPI_CLOCK_DIV16);
注释掉,然后在自己的程序里面分别写上
void enablePN() {
digitalWrite(ETH_SS, HIGH);
digitalWrite(NFC_SS, LOW);
SPI.setDataMode(SPI_MODE0);
SPI.setBitOrder(LSBFIRST);
SPI.setClockDivider(SPI_CLOCK_DIV16);
delay(10);
}
void enableETH() {
digitalWrite(ETH_SS, LOW);
digitalWrite(NFC_SS, HIGH);
SPI.setBitOrder(MSBFIRST);
SPI.setClockDivider(SPI_CLOCK_DIV4);
SPI.setDataMode(SPCR & SPI_MODE_MASK);
SPCR &= ~(_BV(DORD));
SPI.setClockDivider( SPCR & SPI_CLOCK_MASK);
delay(10);
}
需要网卡的时候enableETH,需要NFC的时候启用enablePN,完美解决。
完整测试代码如下:
/* Web Server
* A simple web server that shows the value of the analog input pins.
*/
#include <SPI.h>
#include <Ethernet.h>
#include <PN532.h>
byte mac[] = { 0xDE, 0xAD, 0xBE, 0xEF, 0xFE, 0xED };byte ip[] = { 192, 168, 1, 15 };
EthernetServer server(80);
#define NFC_DEMO_DEBUG 1
#define PN532_CS 5
PN532 nfc(PN532_CS);void initNFC()
{
#ifdef NFC_DEMO_DEBUG
Serial.println(“Begin start NFC!”);
#endif
nfc.begin();uint32_t versiondata = nfc.getFirmwareVersion();
if (! versiondata) {
#ifdef NFC_DEMO_DEBUG
Serial.print(“Didn’t find PN53x board”);
#endif
//while (1); // halt
return;
// skip NFC, continue other step without NFC
}
#ifdef NFC_DEMO_DEBUG
// Got ok data, print it out!
Serial.print(“Found chip PN5”);
Serial.println((versiondata>>24) & 0xFF, HEX);
Serial.print(“Firmware ver. “);
Serial.print((versiondata>>16) & 0xFF, DEC);
Serial.print(‘.’);
Serial.println((versiondata>>8) & 0xFF, DEC);
Serial.print(“Supports “);
Serial.println(versiondata & 0xFF, HEX);
#endif
// configure board to read RFID tags and cards
nfc.SAMConfig();
}
void NFCReading()
{
uint32_t id;
// look for MiFare type cards
id = nfc.readPassiveTargetID(PN532_MIFARE_ISO14443A);if (id != 0) {
#ifdef NFC_DEMO_DEBUG
Serial.print(“Read card #”);
Serial.println(id);
#endif
}
}
void WebPrint(EthernetClient client)
{if (client) {
// an http request ends with a blank line
boolean current_line_is_blank = true;
while (client.connected()) {
if (client.available()) {
char c = client.read();
// if we’ve gotten to the end of the line (received a newline
// character) and the line is blank, the http request has ended,
// so we can send a reply
if (c == ‘\n’ && current_line_is_blank) {
// send a standard http response header
client.println(“HTTP/1.1 200 OK”);
client.println(“Content-Type: text/html”);
client.println();// output the value of each analog input pin
client.print(“welcome to tinyos”);
client.println(“<br />”);
client.print(“//*************************************”);
client.println(“<br />”);
client.print(“www.tinyos.net.cn”);
client.println(“<br />”);
client.print(“//*************************************”);
client.println(“<br />”);
for (int i = 0; i < 6; i++) {
client.print(“analog input “);
client.print(i);
client.print(” is “);
client.print(analogRead(i));
client.println(“<br />”);
}
break;
}
if (c == ‘\n’) {
// we’re starting a new line
current_line_is_blank = true;
} else if (c != ‘\r’) {
// we’ve gotten a character on the current line
current_line_is_blank = false;
}
}
}
client.stop();
}
}
#define ETH_SS 10
#define NFC_SS 5
void enablePN() {
digitalWrite(ETH_SS, HIGH);
digitalWrite(NFC_SS, LOW);
SPI.setDataMode(SPI_MODE0);
SPI.setBitOrder(LSBFIRST);
SPI.setClockDivider(SPI_CLOCK_DIV16);
delay(10);
}void enableETH() {
digitalWrite(ETH_SS, LOW);
digitalWrite(NFC_SS, HIGH);
SPI.setBitOrder(MSBFIRST);
SPI.setClockDivider(SPI_CLOCK_DIV4);
SPI.setDataMode(SPCR & SPI_MODE_MASK);
SPCR &= ~(_BV(DORD));
SPI.setClockDivider( SPCR & SPI_CLOCK_MASK);
delay(10);
}
void setup()
{
Serial.begin(9600);
pinMode(10, OUTPUT);
pinMode(5, OUTPUT);
pinMode(4, OUTPUT);
enableETH();
Ethernet.begin(mac, ip);
server.begin();
Serial.print(“server is at “);
Serial.println(Ethernet.localIP());
enablePN();
initNFC();
//digitalWrite(5,HIGH);
//digitalWrite(10,LOW);
}void loop()
{
// pinMode(4,HIGH);
//digitalWrite(5,HIGH);
//digitalWrite(10,LOW);
enableETH();
EthernetClient client = server.available();
WebPrint(client);
enablePN();
//delay(100);
//digitalWrite(5,HIGH);
//digitalWrite(10,LOW);
NFCReading();
//delay(100);
}
后记:通过这种方式实现了网络、NFC、SD卡读写的协同工作。


 ibnfc:Examples