Arduino读取键盘[转载]
Arduino读取键盘
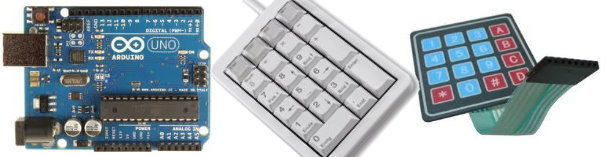
这里提供两种方式从Arduino读取键盘。第一种方式是使用矩阵式(Matrix)键盘,另一种方式是使用PS2键盘。
矩阵键盘(Matrix keypad)
首先必须安装Arduino Keypad键盘库(Keypad library),Arduino Keypad键盘库可以从Arduino Playground下载。Arduino Keypad键盘库让你读取矩阵式键盘而不用编写复杂的代码,此键盘库可以读取3×4, 4×4以及各种矩阵结构的键盘。
使用Arduino Keypad键盘库注意事项
- 该键盘库是属于无阻塞式,按下谋键不放,其余(接下来)的代码还是会继续运行
- 如果编写控制键盘处运用到delay(),这将造成键盘反应迟顿
- 按下谋键,getKey()只返回一个键值,而不是自动重复。松开按键时,可以追踪其RELEASED event
安装Arduino Keypad键盘库
- 下载Arduino Keypad键盘库
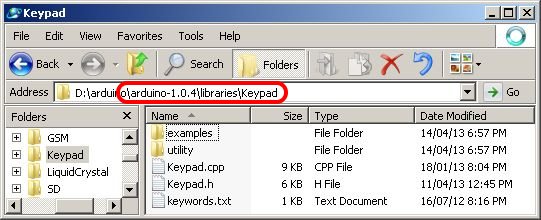
- 将下载了的文件(keypad.zip)解压至Arduino软件的libraries文件夹,如图
- 打开Arduino软件
- 选择File>Examples>Keypad,将会看见以下画面,表示Arduino Keypad键盘库安装成功

4×4矩阵keypad示范
根据下面接线连接键盘至Arduino
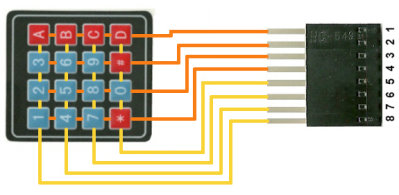
| Arduino | 4×4 Keypad |
|---|---|
| D2 | 1 |
| D3 | 2 |
| D4 | 3 |
| D5 | 4 |
| D6 | 5 |
| D7 | 6 |
| D8 | 7 |
| D9 | 8 |
上载以下代码至Arduino
#include <Keypad.h> const byte ROWS = 4; // Four rows
const byte COLS = 4; // Four columns //Define the keymap
char keys[ROWS][COLS] = {
{‘1′,’2′,’3′,’A’},
{‘4′,’5′,’6′,’B’},
{‘7′,’8′,’9′,’C’},
{‘*’,’0′,’#’,’D’}
}; //// Connect keypad ROW0, ROW1, ROW2 and ROW3 to these Arduino pins.
byte rowPins[ROWS] = {6,7,8,9}; // Connect keypad COL0, COL1, COL2 and COL3 to these Arduino pins.
byte colPins[COLS] = {2,3,4,5}; //connect to column pinouts // Create the Keypad
Keypad keypad = Keypad( makeKeymap(keys), rowPins, colPins, ROWS, COLS ); void setup(){
Serial.begin(9600);
} void loop(){
char key = keypad.getKey(); if (key != NO_KEY){
Serial.println(key);
}
}
使用Arduino软件自带的串口监视器(Serial Monitor)来测试此程序(Baud rate必须设成9600)。当按下谋键时,其返回值将显示在串口监视器。
PS2键盘
首先必须安装Arduino PS2键盘库(PS2keyboard library),Arduino PS2键盘库可以从这里下载。
安装Arduino PS2键盘库
- 下载Arduino PS2键盘库
- 将下载了的文件(PS2keyboard.zip)解压至Arduino软件的libraries文件夹
- 安装方法与安装keypad相似,请参考之。
PS2键盘 示范
根据下面接线连接键盘至Arduino

| Keyboard | Arduino |
|---|---|
| 4 (+5V) | 5V |
| 3 (GND) | GND |
| 5 (Clock) | Digital Pin 3 |
| 1 (Datak) | Digital Pin 4 |
上载以下代码至Arduino
#include <PS2Keyboard.h> const int DataPin = 8;
const int IRQpin = 5; PS2Keyboard keyboard; void setup() {
delay(1000);
keyboard.begin(DataPin, IRQpin);
Serial.begin(9600);
Serial.println(“Keyboard Test:”);
} void loop() {
if (keyboard.available()) { char c = keyboard.read(); // read the next key // check for some of the special keys
if (c == PS2_ENTER) {
Serial.println();
} else if (c == PS2_TAB) {
Serial.print(“[Tab]”);
} else if (c == PS2_ESC) {
Serial.print(“[ESC]”);
} else if (c == PS2_PAGEDOWN) {
Serial.print(“[PgDn]”);
} else if (c == PS2_PAGEUP) {
Serial.print(“[PgUp]”);
} else if (c == PS2_LEFTARROW) {
Serial.print(“[Left]”);
} else if (c == PS2_RIGHTARROW) {
Serial.print(“[Right]”);
} else if (c == PS2_UPARROW) {
Serial.print(“[Up]”);
} else if (c == PS2_DOWNARROW) {
Serial.print(“[Down]”);
} else if (c == PS2_DELETE) {
Serial.print(“[Del]”);
} else {
Serial.print(c); // otherwise, just print all normal characters
}
}
}
使用Arduino软件自带的串口监视器(Serial Monitor)来测试此程序(Baud rate必须设成9600)。当按下谋键时,其返回值将显示在串口监视器。
增加按键音效
按照下面图象连接PC扬声器(此PC扬声器可以从废棄的电脑主板拆岀来),然後稍微更改代码。由于没有此PC扬声器的规格说明,估计供电5V且功率非常小,能够直接由Arduino驱动。如果不放心,可以在Aruino pin10与扬声器之间添加一个100欧姆电阻器。
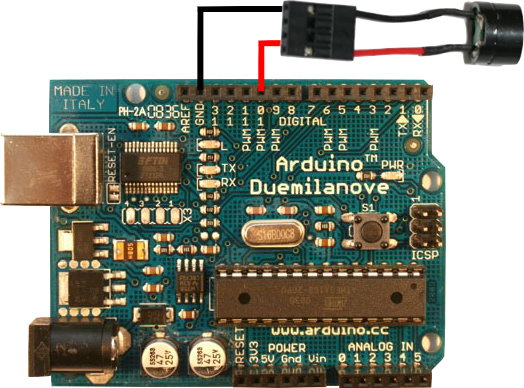
代码方面使用了tone()函数,具体可以浏览Arduino Reference网站
http://arduino.cc/en/Reference/Tone
tone()用法
- tone(pin, frequency)
- tone(pin, frequency, duration)
-
pin是连接扬声器的引脚
-
frequency是输出频率,频率越低,音频就越低。
-
duration音频输出持续时间
-
#include <Keypad.h>
-
const byte ROWS = 4; // Four rows
-
const byte COLS = 4; // Four columns
-
- //Define the keymap
-
char keys[ROWS][COLS] = {
-
{‘1′,’2′,’3′,’A’},
-
{‘4′,’5′,’6′,’B’},
-
{‘7′,’8′,’9′,’C’},
-
{‘*’,’0′,’#’,’D’}
-
};
-
- //// Connect keypad ROW0, ROW1, ROW2 and ROW3 to these Arduino pins.
-
byte rowPins[ROWS] = {6,7,8,9};
-
- // Connect keypad COL0, COL1, COL2 and COL3 to these Arduino pins.
-
byte colPins[COLS] = {2,3,4,5}; //connect to column pinouts
-
- // Create the Keypad
-
Keypad keypad = Keypad( makeKeymap(keys), rowPins, colPins, ROWS, COLS );
-
- void setup(){
-
Serial.begin(9600);
-
}
-
- void loop(){
-
char key = keypad.getKey();
-
if (key != NO_KEY){
-
delay(50); //act as debounce
-
beep();
-
Serial.println(key);
-
}
-
}
-
- #define SPEAKER_PIN 10
-
void beep(){
-
tone(SPEAKER_PIN,2000,90);
-
delay(20);
-
noTone(SPEAKER_PIN);
-
}
转自